


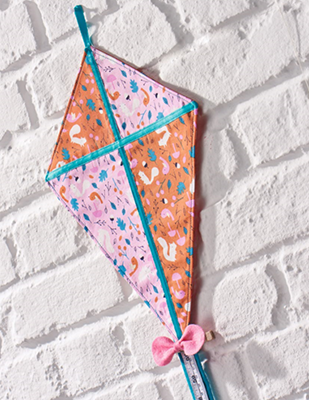
Track your Child’s Height with this DIY Kite Growth Chart
Step-by-Step Kite Chart Sewing Tutorial
By Charlie Moorby in Easy Home Sewing Projects: 101 Projects to Transform Every Room of Your Home
 Roll up your sleeves and reach for your sewing machine! Children love to see how much they’ve grown. This keepsake kite height chart with a tape measure tail will save you from
marking your walls or door frames. Simply glue a colorful felt shape onto a peg for each child and peg them onto the kite tail.
You will need:
- Main fabric: 14 x 24 inches (35 x 60 cm)
- Contrast fabric: 10 x 8 inches (25 x 20 cm)
- Kite tail fabric: 8 x 44 inches (20 x 112 cm)
- Heavyweight interfacing: 16 x 12 inches (40 x 30 cm)
- Ribbon: ¼ x 40 inches (5 mm x 1 m)
- Fabric tape measure: 60 inches (150 cm)
- Felt: For bows, see instructions for details
- Wooden pegs
- Matching sewing thread
- Basic sewing kit
- Notes: Use a 3⁄₈-inch (1 cm) seam allowance
unless otherwise stated.
Cutting the Fabric
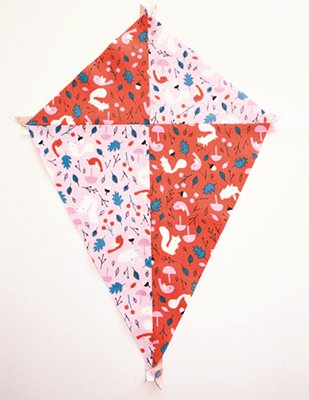
- Trace the kite shape from the downloaded pattern. To make the individual kite shapes, trace each of the four triangles (A, B the top to pieces and C, D the bottom two pieces) separately and then draw a line 3⁄₈ inch (1 cm) outside your traced lines all the way around. Cut out to make your pattern pieces.
- Place your drawn patterns onto the wrong side of the fabric. Cut A and D from the main fabric and B and C from the contrast fabric.
- Cut a 16 x 12-inch (40 x 30-cm) piece of the main fabric for the kite back.
- Cut two strips measuring 2¾ x 44 inches (7 x 112 cm) from the tail fabric.
Making the Kite
- Place triangles A and B right sides together along the vertical straight edge and stitch together. Repeat with triangles C and D.
- Place the joined A and B pieces right sides together with the joined C and D pieces and stitch together along the horizontal edge.
- Press your joined kite shape with seams pressed open and then place the interfacing glue-side down on top of the
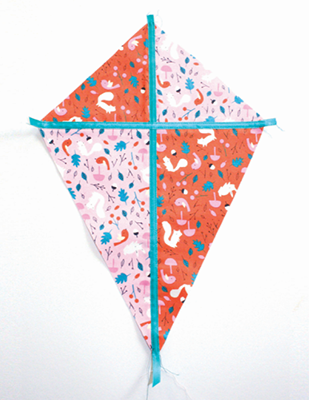
wrong side of the kite and press into place to stiffen your kite. - Place the ribbon centrally on top of the vertical seam and topstitch into place. Repeat to topstitch on top of the horizontal seam.
- Place the kite back fabric right side together with the kite front. Stitch together all the way around the edge, leaving a 23⁄₈-inch (6-cm) turning gap on one edge.
- Trim the points and then turn right side out and press the turning gap under. Topstitch all the way around to neaten and close the gap.
- Cut a 4¾-inch (12-cm) length of ribbon for the hanging loop. Fold it in half and then slip-stitch the ends to the top of the back of the kite.
Making the Kite Tail
- Stitch the two fabric strips right sides together along one short end.
- Fold in half lengthwise, right sides together, and stitch along one short edge and down the length. Turn right side out and then turn the other short edge under by 3⁄₈ inch (1 cm) and slip-stitch closed.
- Place the tape measure down the center of the tail strip, making sure it’s exactly level with one short end. Clip it into place; you won’t be able to pin it easily.
- Topstitch the tape measure into place through the center. Some tape measures are printed with inches on one side and
centimeters on the other, so make sure that the side you want is showing on the front. - Pin the top end of the tail behind the kite so the 59-inch (150-cm) mark is just below the lower point of the kite and slipstitch into place, making sure your stitches don’t come through to the front. (Fig. 3
Making the Bows
- For each bow (make one for each child), you’ll need a 2 x 3¹⁄₈-inch (5 x 8-cm) piece of felt. Cut a 15⁄₈ x 3¹⁄₈-inch (4 x 8-cm) piece for the main bow and then cut the corners into neat curves.
- Cut a 3⁄₈ x 1¼-inch (1 x 3-cm) strip for the knot.
- Pleat the center of the main bow piece and stitch to hold. Wrap the felt knot strip around the pleated center and oversew
neatly to hold the bow in place. (Fig. 4) - Glue the back of the knot of each bow to the center of a peg and then clip the peg(s) onto your kite tail to mark the height of your child(ren). For a mark that lasts, draw a line on the tape measure with a pen, too.
For more home decor sewing projects, get your copy of Easy Home Sewing Projects: 101 Projects to Transform Every Room of Your Home.

Easy Home Sewing Projects
Whether you’re moving into a new home, redecorating an old house, or just updating a room, you’ll find quick and easy projects here to make your living space simply beautiful. The sewing projects inside will decorate every room in your house from your bedroom and nursery to your kitchen and home office. With 101 step-by-step sewing projects, Easy Home Sewing Projects will stir up your creativity.
Get Exclusive Email Offers And Receive 15% OFF On Your First Book Order!


Recent Comments